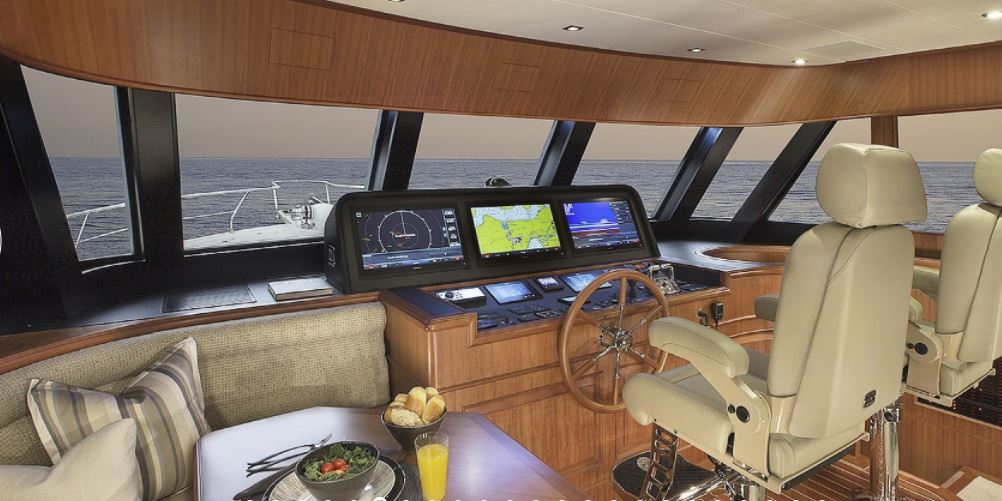
 All of the Hampton yachts I have seen, with a lower PH helm, are setup something like this. (Note, this picture courtesy the Hampton Yacht Group website.) See the big settee at left? This wraps around and can seat at least six people. But it also limits how many people can be standing at the helm on the lookout. In most of my cruising, there has been room for at least four people to be looking out. It's one of the best parts of cruising, just motoring along, taking in the scenery, making plans for the day or evening. So early on Deb and I decided we would want standing room to the left of the instrument area. This does mean giving up some sitting space of course, but boats are all about trade-offs.  Here is a picture HYG's Larry Clark took for me in Shanghai yesterday. Mahalo!
That's the base of the settee at left. We think we can still fit five people (one uses the helm chair turned around to the table. But now two people can be standing alongside as well. The configuration we came up with provided two other desirable benefits. First, see that big white area to the left of the helm wheel? That's access to the inside of the instrument area. As these spaces go, that's one nice BIG access door! In the traditional HYG confg the access is a bit more cumbersome, having to remove the settee cushions and panels in order to crawl in. Second, we got three more storage drawers, which you can see to the left of the access panel. It's really exciting to see our design come to life. Glad to be working with a builder that gives us this flexibility.
0 Comments
No, not as in splashes into our Puget Sound. But into the test tank at the HYG Factory! These are fresh pictures just sent to me. 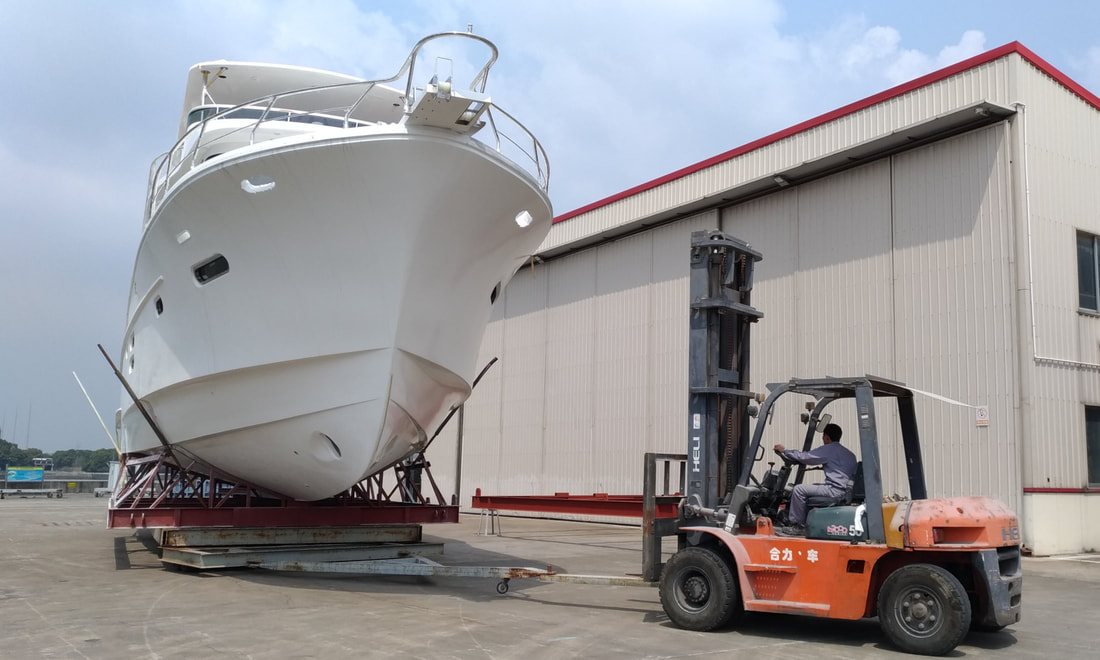 Okay, this is officially NOT her maiden voyage! But she's out in the sunlight. The boat stays in this "cradle" her entire life until she splashes in Seattle. 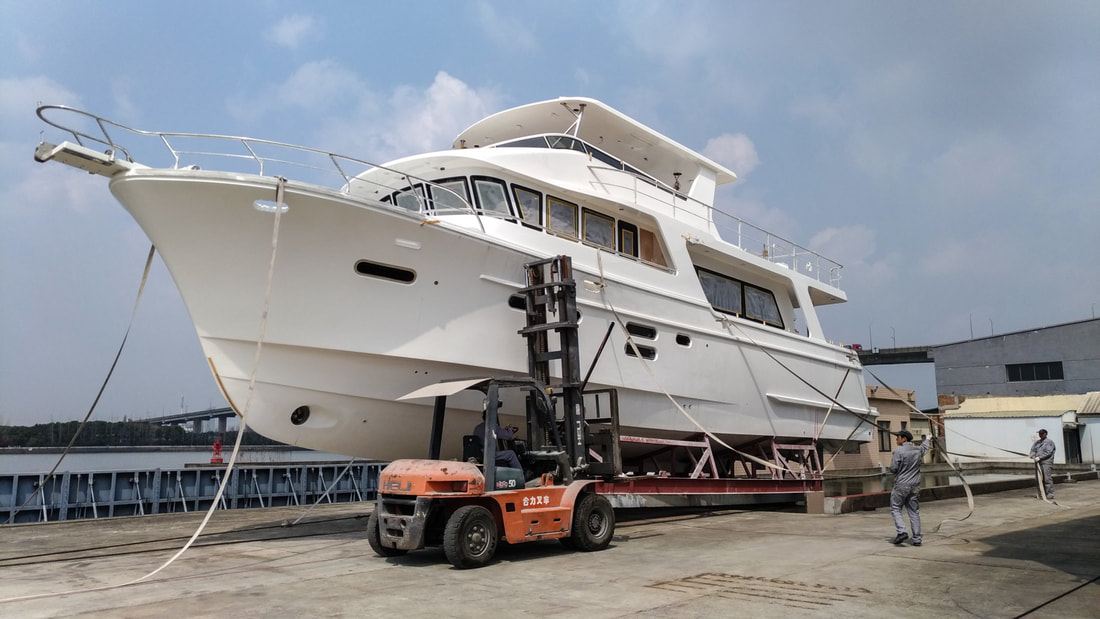 Getting ready to ride stern first into the test tank. Here you can really see how awesome the "reverse rake" front windows look. I believe this is the first Hampton Endurance with this feature. 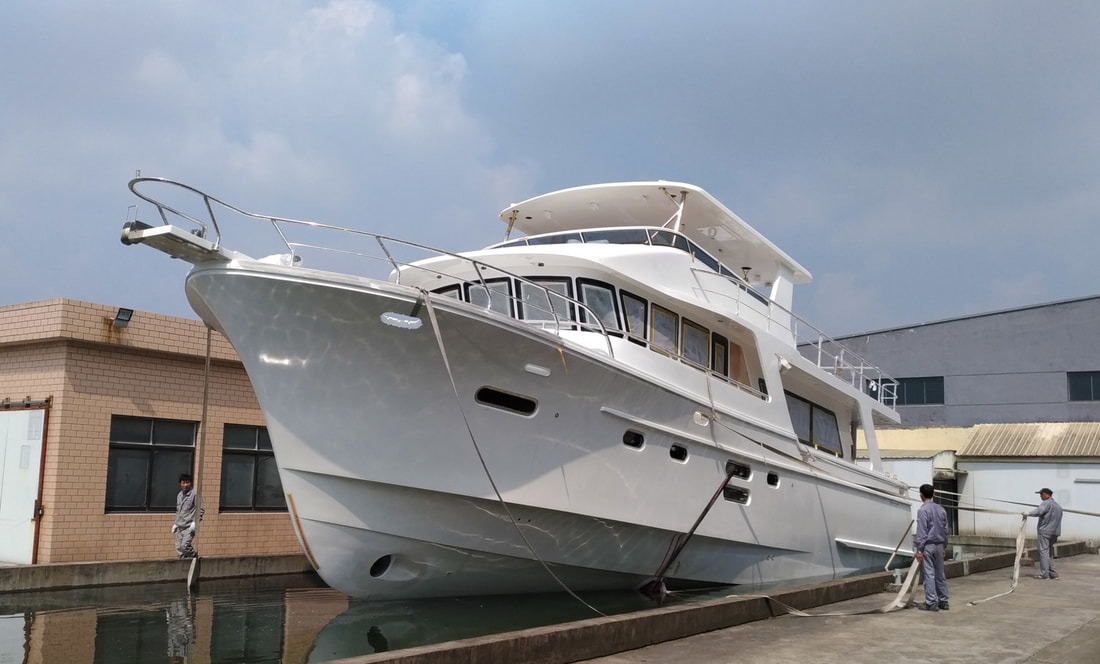 She floats! Maybe a bit stern heavy, LOL? No, that's just the cradle holding her bow up. 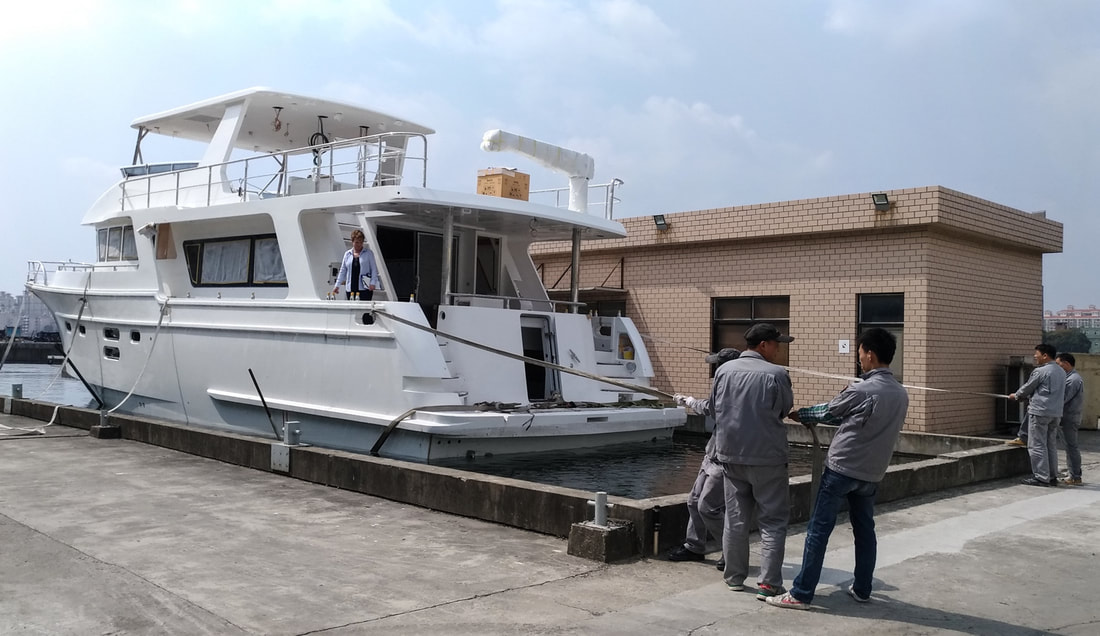 Floating on her own! Seems like just yesterday we were standing at this pool at the factory ourselves, thinking "pretty soon our boat will be in here!" And here we are.
The tank test accomplishes several things. All the engines will be run, the CAT mains, and the Northern Lights generators. If there's any problem with them, that can be taken care of in the factory. But most importantly the boat will be tested for dynamic stability. It will be weighted on each side in various ways, and a variety of data are collected and analyzed. The marine architect certifies each and every Hampton Yacht. I don't personally know more details or I would share them here. Perhaps when it is done I'll have a better understanding. But hey, how about that awesome Steelhead tender crane? 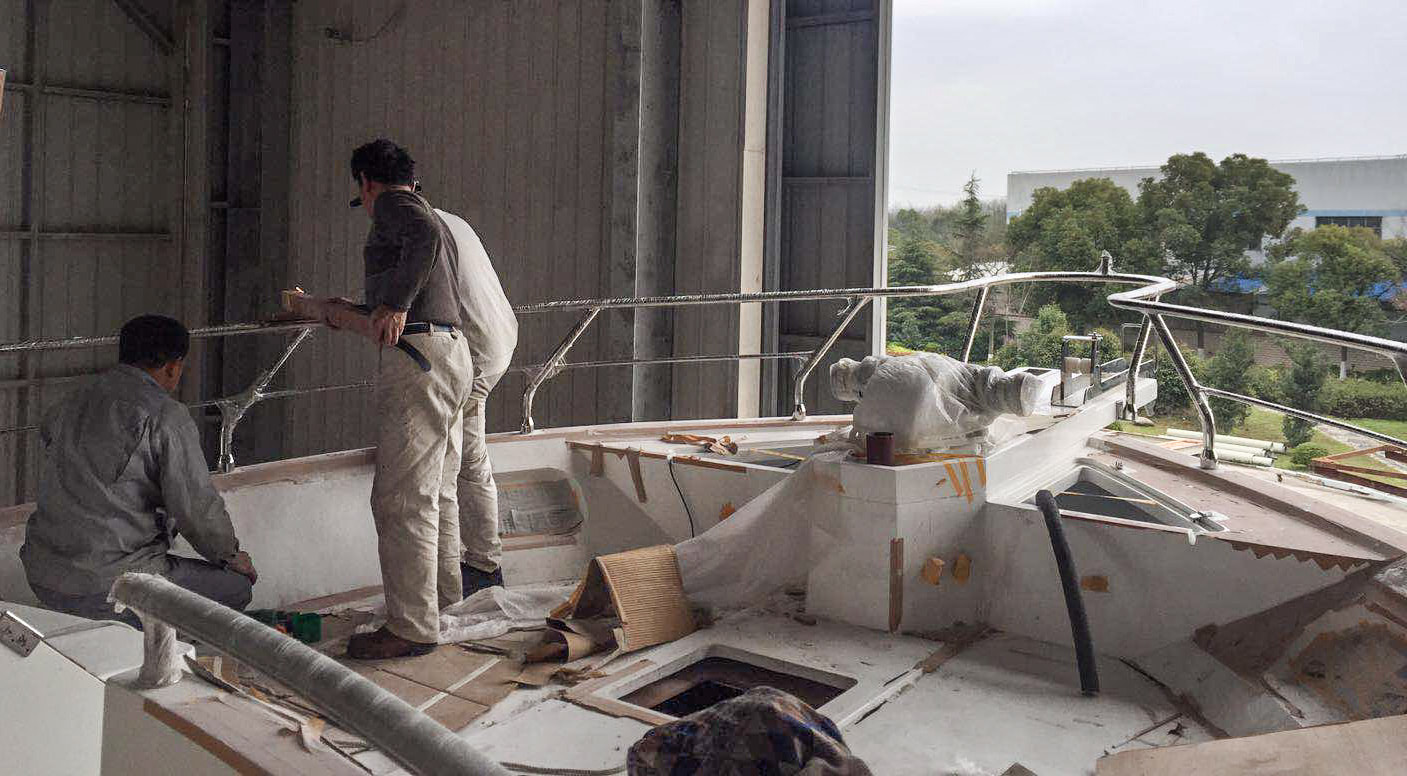 Working on the foredeck. You can see the massive (hydraulic) anchor winch. What a pleasure that will be to use. Twin anchor chain lockers to port and starboard.
I came up with a handy way to do the anchor/chain washdown. Will show that later when we get the boat here, The Hampton railings are oval in profile, they fit into the hand so nicely. Just one more of the "little things" that makes these boats so special. Less than a month until ship date! Following yesterday's post about the pilot house helm, today we will head upstairs to the flybridge. All in all, here in the Pacific Northwest, I think use of the flybridge while underway is kind of spotty. Some people totally enclose their flybridge so they can keep it warm. I feel we already have a great helm in the pilot house that is enclosed, with everything we need. Flybridges are awesome when anchored or docked though. We have had several memorable dinners at anchorages in the B.C. and the San Juans. So with that in mind I went for kind of a minimalist approach with electronics and controls. 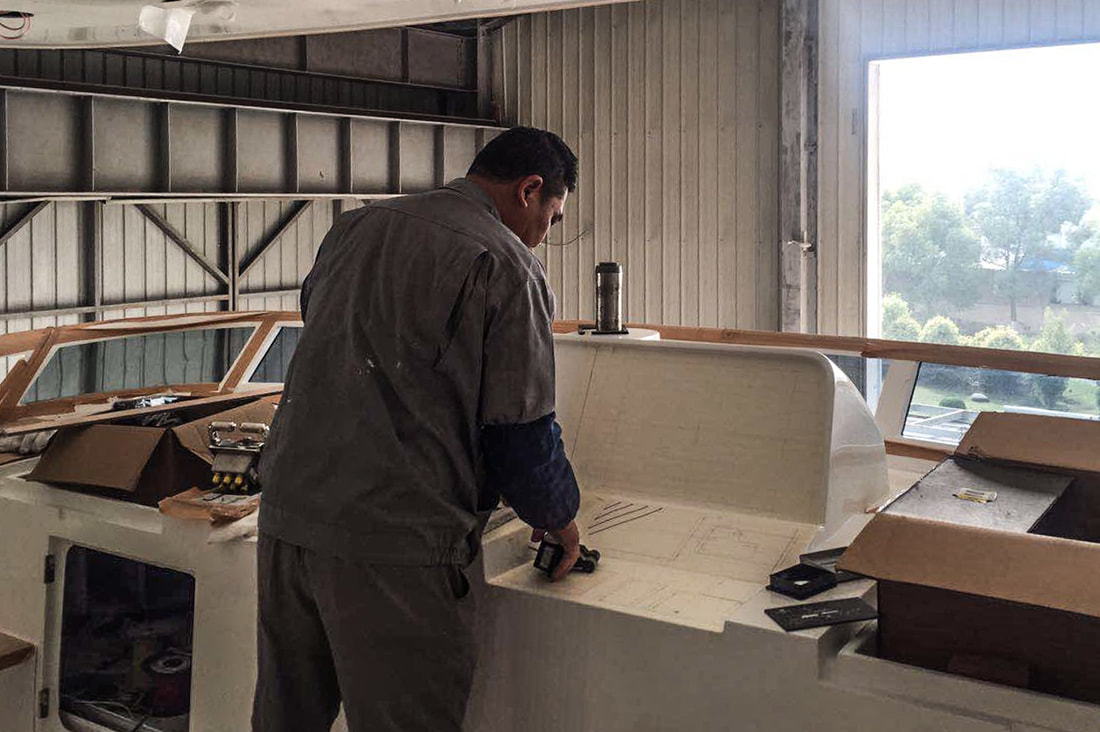 HYG Craftsman contemplates first cut for controls. 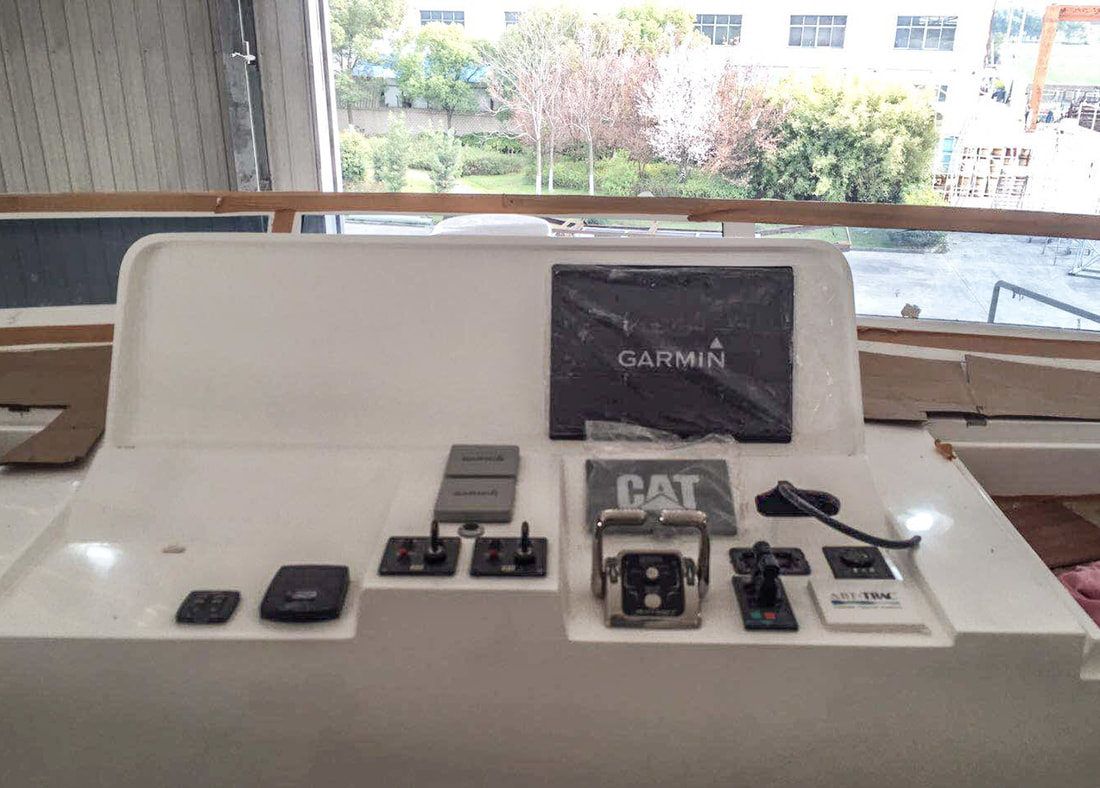 I used the same approach of keeping the left hand side mostly open. I spec'd only one Garmin MFD. For how often we will drive from here, I think that is sufficient. We can bring up a tablet and remote any of the screens from below over WIFI. The Garmin displays are about $7,000 apiece, so I can't see filling up the helm with them just for the sake of it.
The color CAT engine displays I showed in yesterday's post are also shockingly expensive. One display can do split screen and show data for two engines, so that's what I opted for up here in the flybridge. Seeing this picture I am lamenting the fact that I didn't have them do a remote drawer for the keys like I did in the pilot house. I think that's the first thing I have seen where I say "hmmm, should have put more thought into that one." Wont' be the last, right? A lot of trawler owners call the engine room "the holy place." I'm hoping the engines and and all the components in that room hum along happily for many, many, years. I'll give them the care they require, but there are other places I'd rather be. Like the helm, exploring the beautiful PNW! 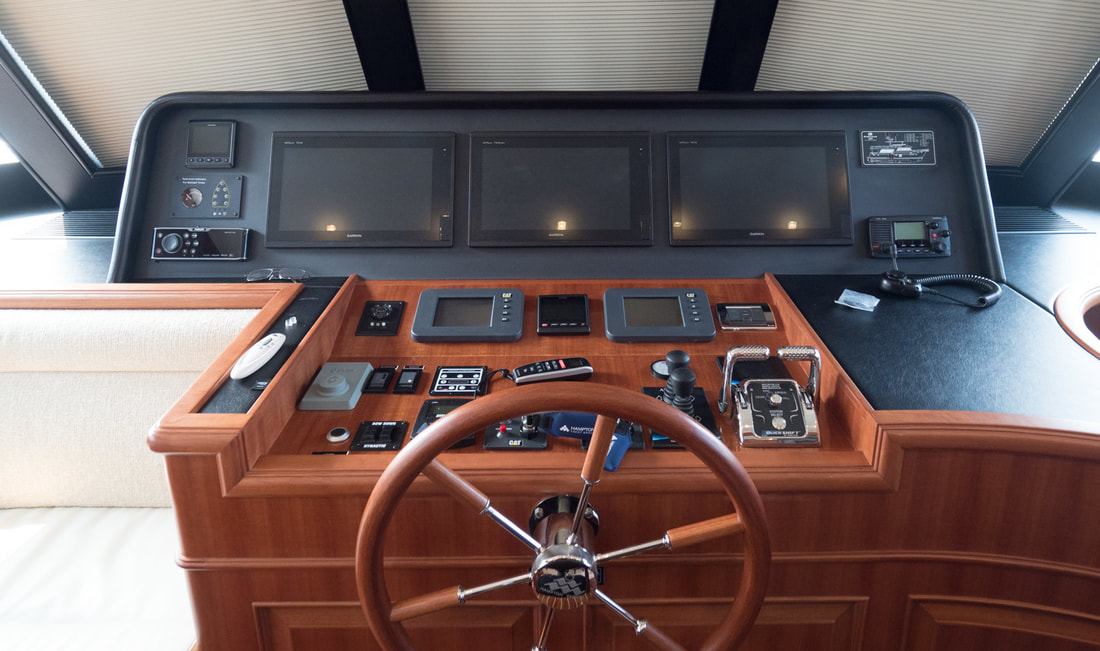 20 years ago a yacht helm was incredibly cluttered with so much equipment and gauges. Nowadays with electronic displays, much less. This shot is from an existing Hampton Endurance 658. The heart of today's helm are the displays. They display the charting, radar, sonar, cameras mounted around the boat, monitoring systems and even more. I want four of them, two Garmin MFD's (Multi Function Displays) and two displays driven by a PC for cameras, monitoring the boat's systems, and a backup charting software that isn't dependent on the Garmin electronics. So that meant relocating all of the units you see on the upper portion of this display, besides the three monitors. As far as the horizontal area, pretty much most builders take the remaining components and space them out equally around the area available. I however wanted some flat space that wasn't used up. Sometimes you have to eat while driving, would be nice to have a place to set a plate down. Or put a laptop or tablet. Many people are doing a lot of their charting on tablets these days (or as a backup to the other systems). Or maybe down the road you want to add a new component, and you don't want to have to redo the entire helm area. Also, having two computer displays means you'll want at least a mouse, sometimes even a small keyboard. So they can be placed here too. 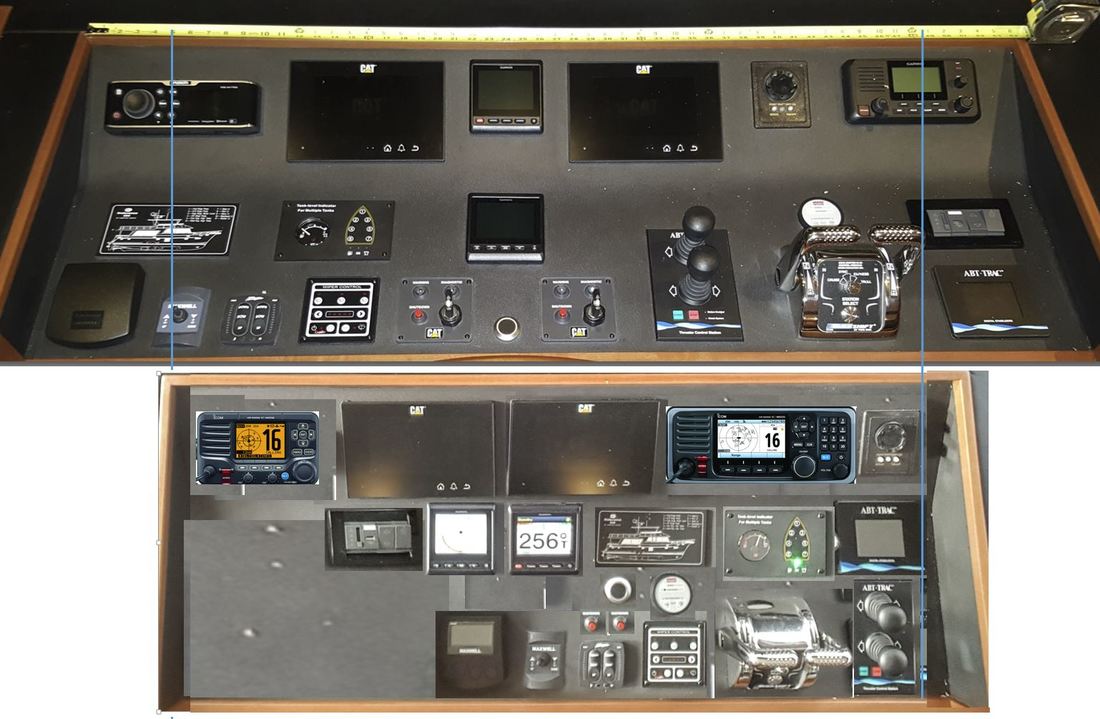 Hull #11 (which was available for us to view while we were in Shanghai) has one foot more beam than Mahalo. They made the helm area wider. I used a picture of that helm, and it's components, and built my own mockup in PowerPoint, which you see above. Subsequent to this design, we relocated the "ship's lights" and "tank tender" monitors to the electrical panel area to the right of the helm (not shown). We also specified moving the switch/USB charger (under the port CAT display) to the side of the display panel area. Then Scott Hauck of HYG printed my drawing to scale, and we placed it on the helm of one of the existing boats in Seattle. We "simulated" actually driving the boat, viewing the displays, and handling the controls. I was happy with the layout, and HYG in Shanghai turned my basic work into this scale drawing. 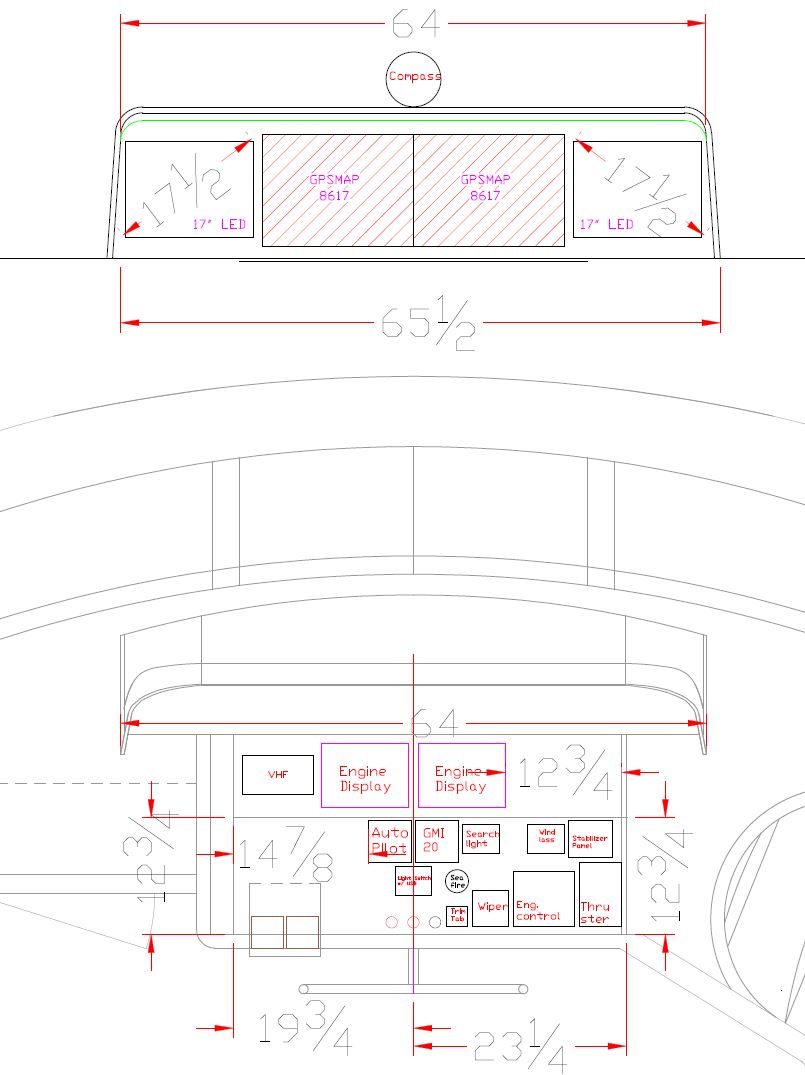 One of the things I did was flip the location of engine controls and thrusters. (i.e. on Mahalo the thrusters are to the right.) My reasoning is that you spend much more time adjusting throttles/transmission than you do with thrusters, and I wanted them to just fall in to our hands as we hold the wheel. I ran this idea past a couple of other owners and they were favorable. We will have two VHF radios as in my mockup, although only one is shown in this drawing. I also felt that the engine start keys took up unnecessary room and are just used for a few seconds of any cruising day. (They are shown in the picture above to the left and right of the black horn button in the center.) HYG agreed to build a small drawer at the left and locate the keys there. That's right in front of where it says "14 7/8." 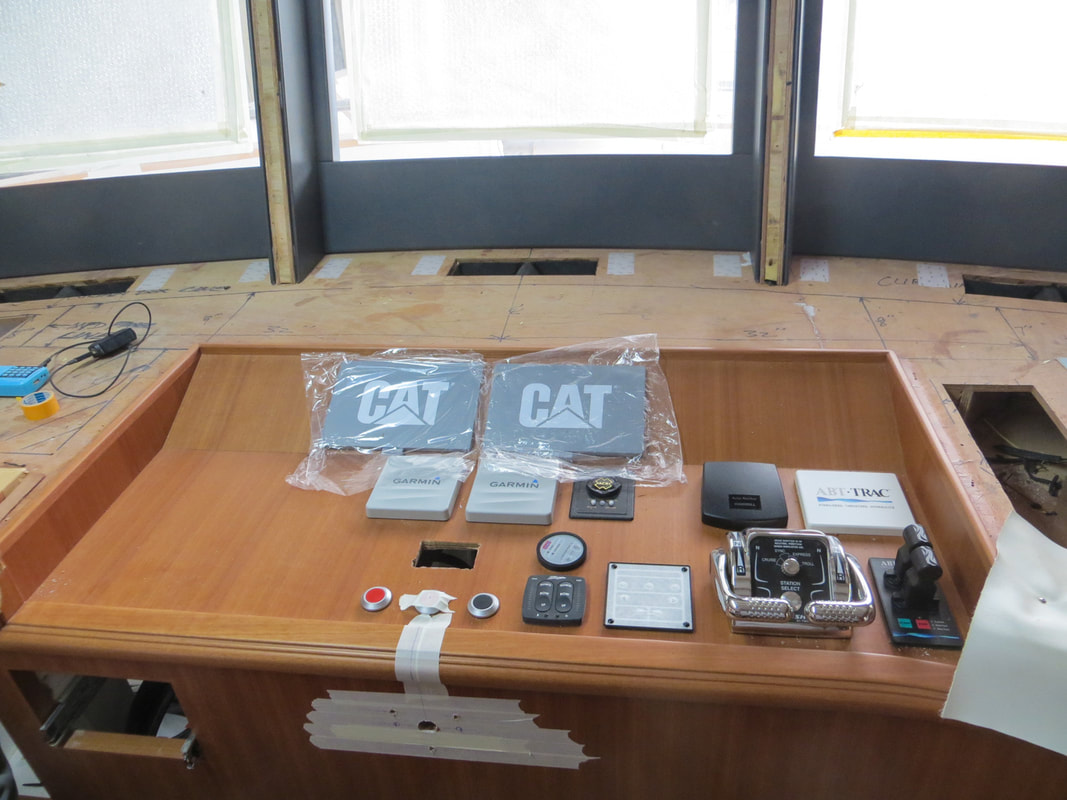 So here we are as of today, March 23, 2018. She's looking good! It's pretty de-cluttered as boats go these days, yet the most important controls and information are readily available. (Note the binocular well to the right which was discussed in a previous blog post.) You can see the key drawer area, lower left. To comply with ABYC standards, engine kill switches must be readily available, so Hampton agreed to remote these to the top area. There's one in red you can see, and the other is under the tape. The black button to the right is the horn. These buttons are really out of the way, the wheel will be in front of them. The other items, roughly left to right are:
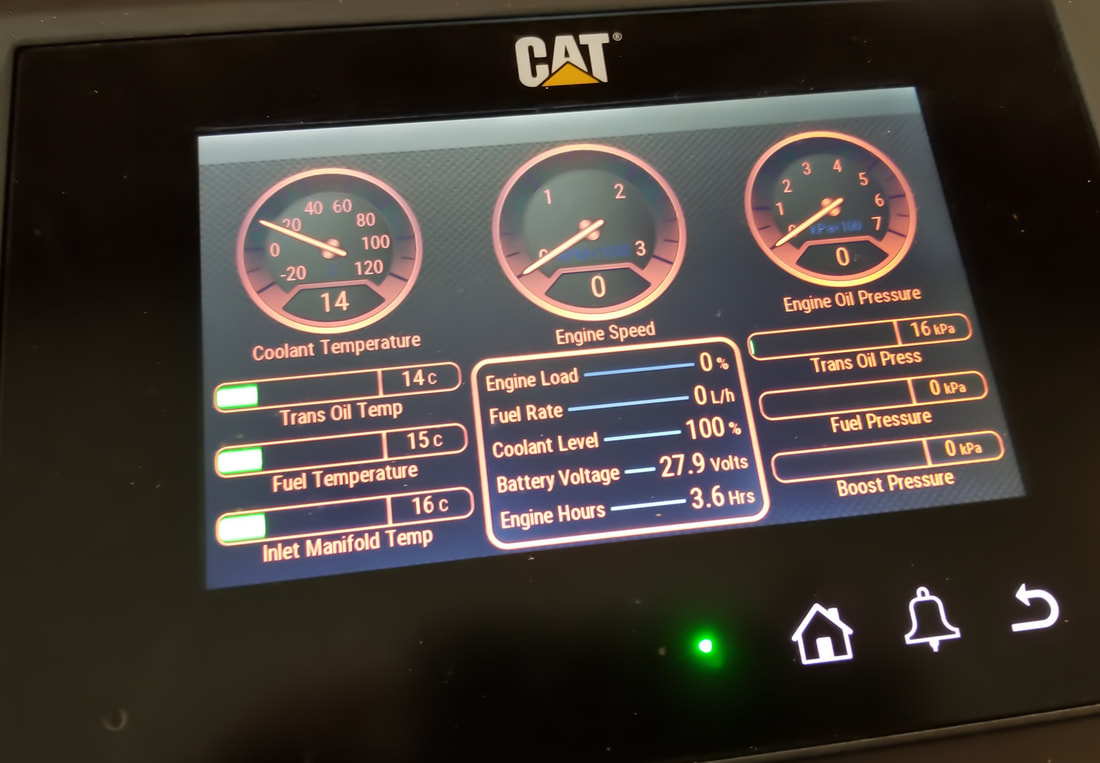 Speaking of the CAT engine displays, here is one powered up. Although you can see that the engine isn't running. But take a look there, how many old fashioned gauges would it take to display all this info? A ton! And this is just one page. You can configure any number of pages to display any amount of information.
We were fortunate that CAT came out with these color displays just in time for us to take advantage of them. I believe hull #11 (where I shot this picture) was the first one with the new color displays, previous to that they were very basic monochrome. Might sound like a bit of fluff, but just the idea that glancing down and seeing everything "green" means more time looking outside. If there's a problem, that part of the display will go red and there is an audible warning. Three months from now Mahalo's engine displays will be showing our purring CATs cruising Puget Sound! |
Archives
January 2020
Categories
All
|
 RSS Feed